Implementing 2D Perlin Noise
1 What to expect
I will talk about what Perlin noise is and how it is used. For simplicity, I will only talk about the 2D case. I will mostly focus on the mathematical description with a simple implementation in JavaScript.
There are already tons of great posts on Perlin noise. Here are some examples, http://flafla2.github.io/2014/08/09/perlinnoise.html, http://lodev.org/cgtutor/randomnoise.html,
These are recommended but not required to understand this post. They are also themed for programmers. I believe a better way to learn algorithms is from formal mathematical descriptions. Even without writing code, mathematical formulas lead to a better understanding.
2 Background
2.1 What is Perlin noise
Perlin noise is an algorithm used to generate natural looking objects, clouds, terrain, hand writing, etc. If you want to generate the nature, this is the right thing for you.
2.2 Application of Perlin noise
- Minecraft uses modified 3D Perlin noise for its terrain generation. Starbound used 2D Perlin noise, and here is a great post describing the method https://playstarbound.com/october-27th-caves/.
3 Algorithm description
Please note that I made up all the math myself. Please tell me if you spotted any mistakes or inconsistencies with the algorithm.
I will add some pictures later for better illustration…
3.1 Procedure for noise generation
Perlin noise is based on random "gradients" at grid points. Ultimately, N-dimensional Perlin noise is a function \[P: \mathbb{R}^N \to \mathbb{R}\]
This function assigns a "height" to each point in the N-dimensional space. In 2D, it is also known as a height map. Of course, we can see the function needs be smooth to make sense.
For simplicity, I will describe the procedure in 2D. If you are interested in higher dimensional Perlin noise, you can simply replace "2" in the following context with "N", replace "line" with "hyper plane", replace "circle" with "hyper sphere", etc.
First, we divide the \(xy\) plane into a grid with vertical and horizontal lines at integer coordinates. Each point with integer coordinates is called a grid point. We can see \(\mathbb{Z}^2\) the set of all grid points.
At each grid point, we randomly assign a "gradient" to the point. The "gradient" here is not the same gradient as in calculus, but it has similar purposes. The random function we take here maps anything uniformly at random to the unit circle \(C\). \[C=\{(x,y)\in \mathbb{R}^2: x^2 + y^2 = 1\}\]
We use \(g\) for the function that maps \(\mathbb{Z}^2\) to \(C\). \[g: \mathbb{Z}^2\to C\]
Now we fill in the place inside the grid. Consider a single grid with 4 corner points, \((x_1, y_1)\), \((x_1, y_2)\), \((x_2, y_1)\), \((x_2, y_2)\), and a point \((x,y)\) inside this grid. Let \(v_{ij}=g(x_i, y_j)\) representing the gradient at \((x_i, y_j)\).
We first decide that for each grid point, if its gradient is "pointing towards" \((x,y)\), it wants to raise \((x,y)\), otherwise it wants to lower it. So the direction of the "gradient" represents the "uphill" direction. This is also the reason why it is called "gradient" in the first place. We can use a dot product to achieve this. Let \(h_{ij}\) represent how much \((x_i, y_j)\) wants to raise \((x,y)\). We have
\[h_{ij}=v_{ij}^T \begin{bmatrix}x-x_i \\ y-y_j\end{bmatrix}\]
We then make the second decision: If \((x_i,y_j)\) is farther away from \((x, y)\), it has less effect on the height of \((x,y)\). For example, If \((x,y)\) is located at the center of the 4 grid points, the 4 grid points have equal effect on \((x,y)\). This step can be achieved with interpolation. For simplicity, we look at linear interpolation first.
\[\mbox{lerp}: S\times S\times [0,1]\to S\] \[\mbox{lerp}(h_1, h_2, \lambda) = (1-\lambda)h_1 + \lambda h_2\]
Now we perform a linear interpolation between \(h_{11}, h_{12}\) and a linear interpolation between \(h_{21}, h_{22}\).
\[h_1 = \mbox{lerp}(h_{11}, h_{12}, y - y_1)\] \[h_2 = \mbox{lerp}(h_{21}, h_{22}, y - y_1)\]
Next we perform another linear interpolation between \(h_1, h_2\).
\[h = \mbox{lerp}(h_1, h_2, x - x_1)\]

And finally we set \(P(x,y) = h\). Now we have properly defined \(P\). We call this \(P\) the generated Perlin noise.
Notice if we use different random function \(g\), we will get different Perlin noise. In practice, to make sure we generate the same noise each time, we can take the random function to be some Hash function \(g\). Since we apparently cannot sample from a continuous space, we can divide the unit circle into lots of points and sample from the discretized unit circle instead.
Finally, we need to discretize the noise itself. We need a proper sample rate and that's it. The sample rate should be relatively small. If we sample at all grid points, then we will have a flat surface always, which is not desired. This effect will be discussed next.
3.2 Extensions
3.2.1 Effect on the grid points
Now you might be thinking that the algorithm is flawed when you look at the grid points. For example, when \((x ,y)=(x_1, y_1)\) where \((x_1, y_1)\) is a grid point. The dot product gives \(h_{11}=0\), and the interpolations give \(h=h_{11}\). So each grid point will have \(0\) as its height no matter how we change the noise.
This effect is indeed a big problem, but if we superpose a ton of different Perlin noise together, the effect is not quite noticeable. I personally think of this like the superposition of sines and cosines.
3.2.2 Higher dimensions
In higher dimensions, generating points uniformly at random is not as intuitive as in the 2D case. Although there are plenty of methods out there, efficiency could be an issue. If you are creating a game and you need very high performance, a nice workaround is generate a ton of points on the hyper sphere beforehand and then random sample on them. In fact, total randomness may not even be a good thing, in Perlin's improved noise, he chose only 12 directions to sample from.
3.2.3 Amplitude, frequency, and superposition
Clearly, using the construction above, the height is restricted to a certain range. To change this range, we can simply multiply \(P(x,y)\) by a constant \(R\) and get
\[P'(x,y) = RP(x,y)\]
\(P'\) is a Perlin noise with its amplitude scaled by \(R\).
Similarly, this original Perlin noise will have bumps inside almost every grid. If you want larger bumps, you can stretch the noise on the plane. The transformation that stretches an object on the plane can be described as
\[P'(x,y) = P(x/s, y/s)\]
\(P'\) is a Perlin noise stretched \(s\) times in the 2 directions on the plane. Higher \(s\) means lower frequency.
Now we have seen how to stretch the noise vertically and horizontally. we can similarly translate the noise on the plane by taking \(P'(x,y)=P(x-x_0, y-y_0)\).
Finally, we can add up a bunch of Perlin noise with different parameters(different translation, scaling, and hash function). We can intuitively see that low frequency represents large-scale terrain changes (hills, basins), and high frequency represents small-scale terrain changes (bumps). Putting it all together
\[P'(x,y) = \sum_i R_iP_i((x-x_i)/s_i, (y-y_i)/s_i)\] Or if you prefer frequency \[P'(x,y) = \sum_i R_iP_i(f_i(x-x_i), f_i(y-y_i))\]
This is what we want to implement.
4 Implementation
In this section I will use Typescript since types make everything clear. If you only know JavaScript, you should be able to follow without a problem.
First we implement a function that randomly samples point on the unit circle. For simplicity, I assume we already have a hash function that generates integers in range \([0,255]\) based on coordinates. Call this function \(hash(x,y)\). Such function can be found in the random-js package. For example, you can do
Random(Random.engines.mt19937().seedWithArray([x,y,42])).integer(0, 255);
Now we generate a look up table for the circle.
const length = 255;
const grad = [];
for (let i = 0; i < length; i++) {
  grad.push([Math.cos(2 * Math.PI / i), Math.sin(2 * Math.PI / i)]);
}
function g(x: number, y: number) {
  return grad[hash(x, y)];
}
Linear interpolation \(\mbox{lerp}(h_1, h_2, \lambda)\) and dot product might be useful
function lerp(h1: number, h2: number, lambda: number) {
  return (1-lambda) * h1 + lambda * h2;
}

function dot(v1: number[], v2: number[]) {
  return v1[0] * v2[0] + v1[1] * v2[1];
}
Now we can implement the perlin noise for arbitrary point \((x,y)\).
function noise(x: number, y: number, g: (x: number, y: number) => number[]) {
  const x1 = Math.floor(x);
  const y1 = Math.floor(y);
  const x2 = x1 + 1;
  const y2 = y1 + 1;

  const h11 = dot(g(x1, y1), [x-x1, y-y1]);
  const h12 = dot(g(x1, y2), [x-x1, y-y2]);
  const h21 = dot(g(x2, y1), [x-x2, y-y1]);
  const h22 = dot(g(x2, y2), [x-x2, y-y2]);
  const h1 = lerp(h11, h12, y-y1);
  const h2 = lerp(h21, h22, y-y1);
  const h = lerp(h1, h2, x-x1);
  // Yes, I know there is a lot to improve. Here I just stick to the math.

  return h;
}
Now we can use the function above and superimpose
function superimposedNoise(
    x: number, y: number,
    amplitudes: number[],
    translationXs: number[],
    translationYs: number[],
    frequencies: number[],
    hashFunctions: ((x: number, y: number) => number[])[]) {
  let s = 0;
  for (let i = 0; i < amplitudes.length(); i++) {
    s += amplitudes[i] * noise(frequencies[i] * (x - translationXs[i]), frequencies[i] * (y - translationYs[i]), hashFunctions[i]);
  }
  return s;
}
Now you just need to find some parameters, discretize the plane, and feed each point in the discretized plane into the function. The drawing details will not be discussed here. You should be able to learn it from any computer graphics tutorial.
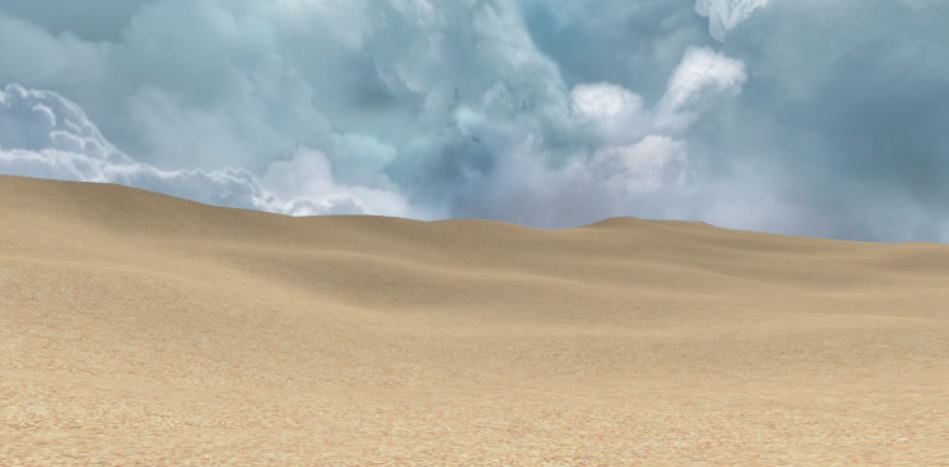
5 Demo
Here is some terrain I generated with the algorithm. The sky box is found here.
6 References
Perlin has posted an improved Perlin noise algorithm here http://mrl.nyu.edu/~perlin/noise/.